Getting started with Git
What is Git?
Git is a Version Control System (VCS) that can be used on projects as a tool for source code versioning.
Why should I use it?
Version control is crucial as it not only allows multiple people to work on and use the same set of files but also protects against things like loss of laptops (which I have seen happen many a time!).
With Git, everything is tracked and in cases of emergency where everything goes wrong, it’s always possible to revert to an earlier version, minimising loss of data and resources.
A key distinction between Git and other VCSs is that Git is distributed, as opposed to centralized. Although we do tend to use things like GitHub as our ‘central store’, that is more of a convention and relying on a central server is optional.
The distributed nature of the system means that if a server dies, we can use our local repository to back it up. It also makes branching and merging much easier and subsequently allows more concurrent and collaborative work to take place.
Git also differs from other VCSs in its approach towards data. As opposed to storing information as file-based changes, it stores data as a ‘stream of snapshots’ and each ‘commit’ points to a snapshot of the project at the time the commit was made.
How do I use it?
You can download, set up and configure Git on your machine by following the instructions on the Atlassian website.
For the purposes of this tutorial, I will assume you have done so and proceed with our next step — creating a repository on GitHub to store our files.
To do this, sign up for an account on GitHub and log in.
To create a new repository, click the plus sign in the top right-hand corner and select ‘New repository’.

Enter a sensible name and description for your repo.
Choose the appropriate privacy settings.
And select ‘Initialize this repository with a README.’

Copy the clone URL for the repo.

We are now ready to clone this repo i.e. effectively make a copy of it on our local machine.
Navigate to a suitable directory on your machine. I have a main ‘GIT’ folder where I clone all my repos. Open up a terminal window and type:

In Windows Explorer, you should see a folder called ‘git-tutorial’ with a README file inside it.
We can now interact with this local repo using various git commands. These can be easily googled so if you forget the syntax of a certain command, don’t fret. Alternatively, if you are not a fan of using the command line, you can download SourceTree or TortoiseGit, both of which provide a nice graphical interface to work with.
As we chose to initialize the repo with a README file, we can see, on GitHub, that the master branch which is created by default upon initialization, contains a README file. It is good practice to have this file in your project, documenting what is within the repo and how to run any code etc.

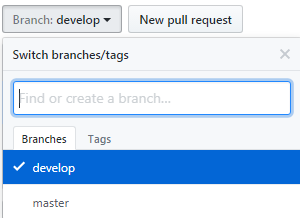
Now, let’s switch to a new branch called develop.

This newly created develop branch will now contain what is in the master branch as it is based on master.
However, you won’t be able to see this in GitHub as develop only exists locally. So let’s push it.

As the develop branch currently has no upstream branch, our command will push develop and set the remote as upstream. So the next time we need to push develop, a simple ‘git push’ will do the trick.
You should now see the develop branch in GitHub.
When you edit or add files to the repo on your local machine, you can save these changes in your local repo and add a message to state what the change is.
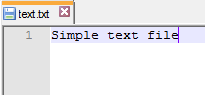
Let’s add a simple text file to our develop branch with some dummy data. Create a text file in Notepad and save it in the directory.
Stage the text.txt in the current directory for a commit.

Commit the staged files.

It is important to write a commit message that is informative and actually makes sense (not ‘my commit’).
Finally, push these changes to the remote central repo.

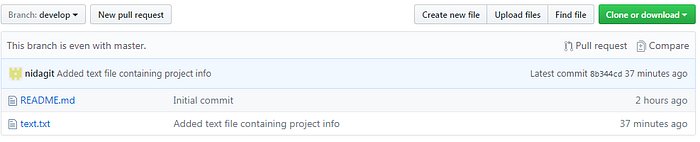
You should now be able to see a develop branch, in addition to master, on GitHub, containing a README file and text file, complete with the commit message you entered earlier in the command line.

Note that our develop branch is now one commit ahead of master as master only contains the README and not the text file. To solve this, we can merge develop and master.


Now, both branches are even…
…as master now contains README and text.txt
You can also do multiple commits locally and then push them in one go. But you should definitely commit at regular intervals to avoid losing any work.
Think of this as making changes to a large Excel spreadsheet, you’d want to keep saving it as you work through it, even if it is not ready to be emailed out to other people.
What is Git Flow?
Recently, I worked on a few projects where we had multiple developers writing code simultaneously. In these cases, it is useful to leverage Git branching models to make checking in and merging code easier. A branching model we used, that turned out to be very successful, is called Git Flow.
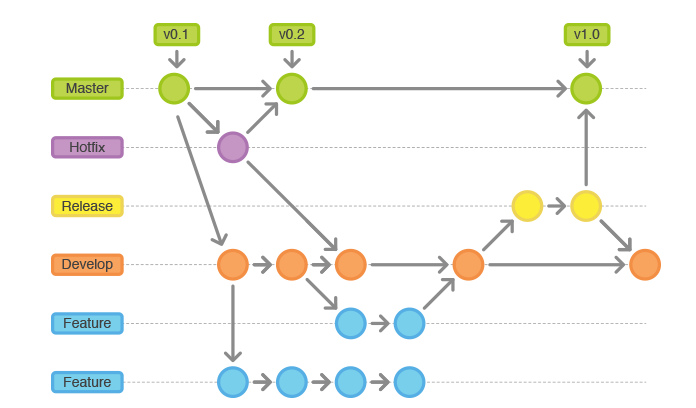
Each repository in a project should be uniquely named and have:
- A master branch that holds code we want to put in production.
- A develop branch that holds the overall codebase that is being currently worked on.
Additionally, you can create:
- Feature branches
- Release branches
- Hotfix branches
A feature branch is created (normally from develop) per each feature or task. So a developer might work in multiple feature branches if he/she is working on more than one feature, test their work locally and once they are satisfied with what they have built, merge their feature with develop.
My mini cheat sheet to do this:
In feature — commit then push
Checkout develop — pull
Checkout feature — merge with develop, test to make sure everything works okay, then push
Checkout develop — pull, merge with feature, then push
If the feature is still in development, remember to checkout to the feature branch again before resuming work.
Note that pulling the latest version of develop is critical as on larger teams it is a common occurrence for multiple people to be checking in their changes frequently, meaning that it is very easy for your local version to get out of step with develop, so this extra step can save you from some horrible merge conflicts.
You can read more about this branching model here.
Happy pulling, pushing and committing!